


Help
Out in the field, don’t have the user manual, never
used the Trogloprobe system before and only got a
mobile phone?
Here are a few simple procedures to get you started,
formatted so it can be viewed on a mobile device.
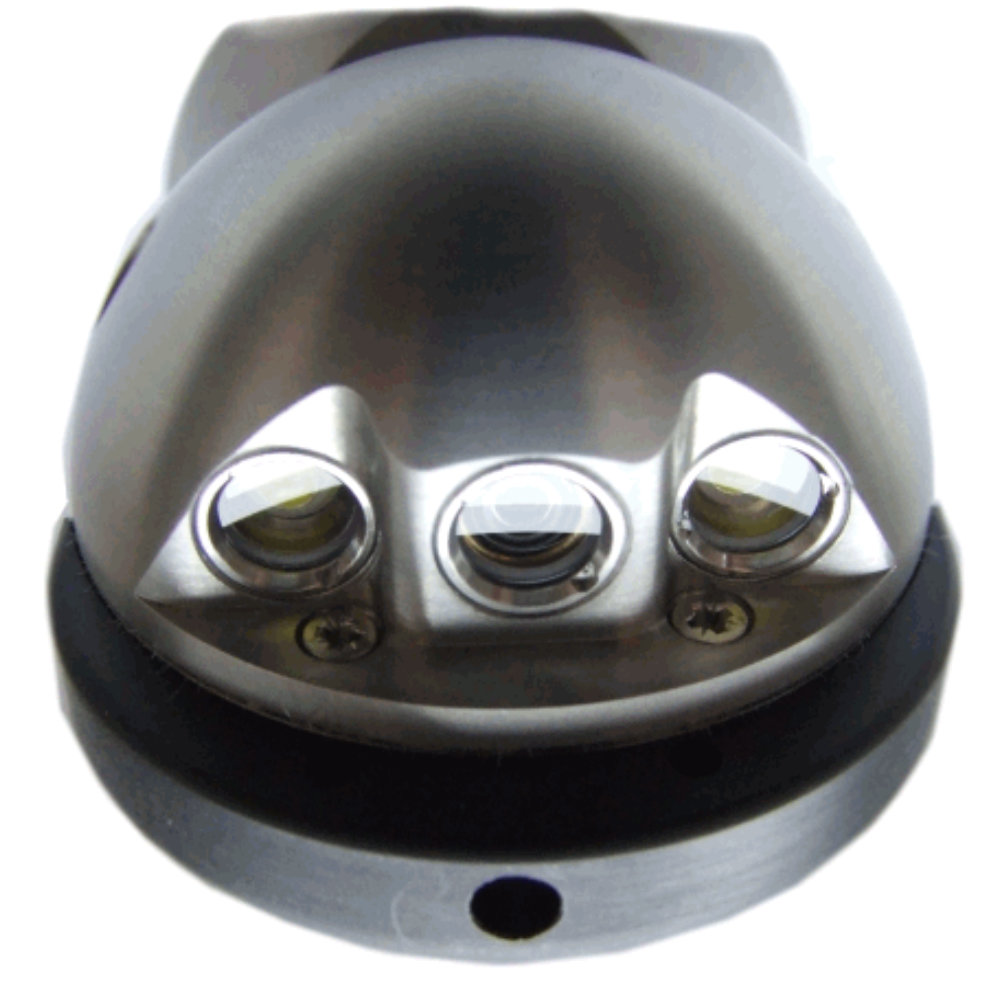
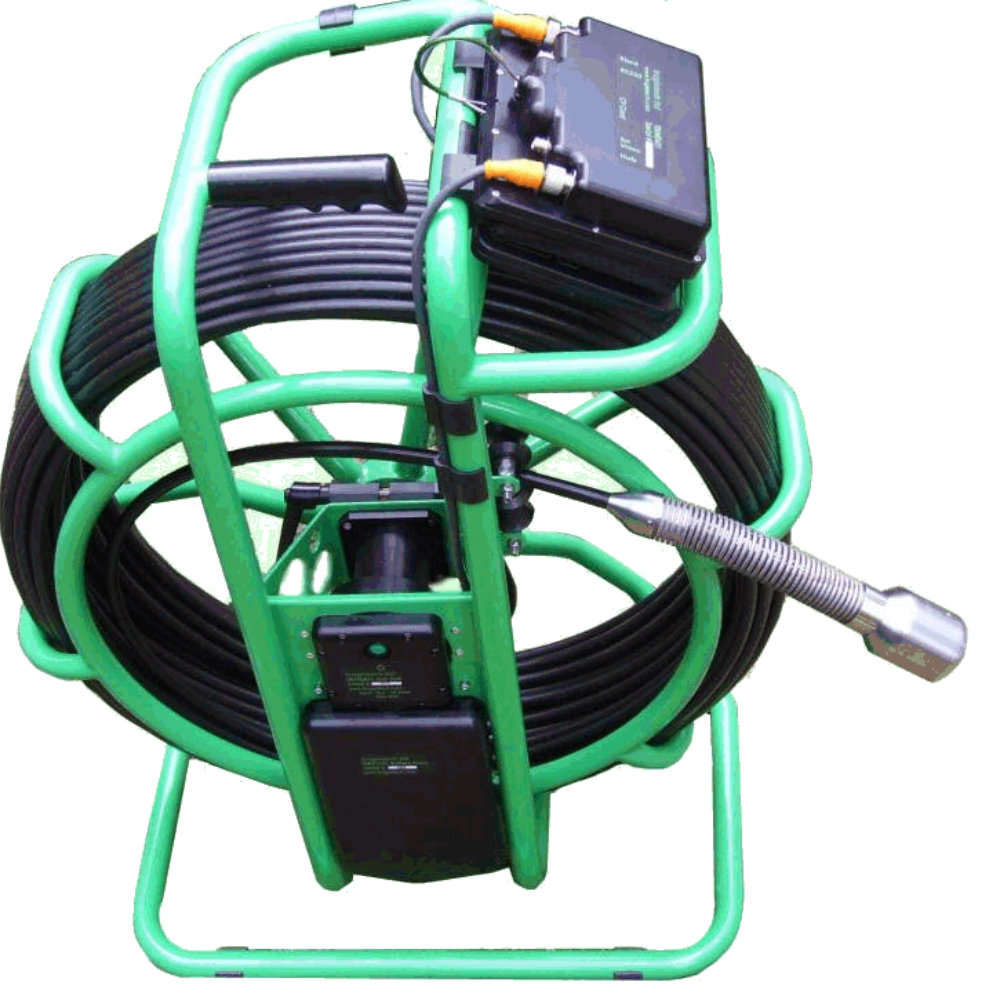
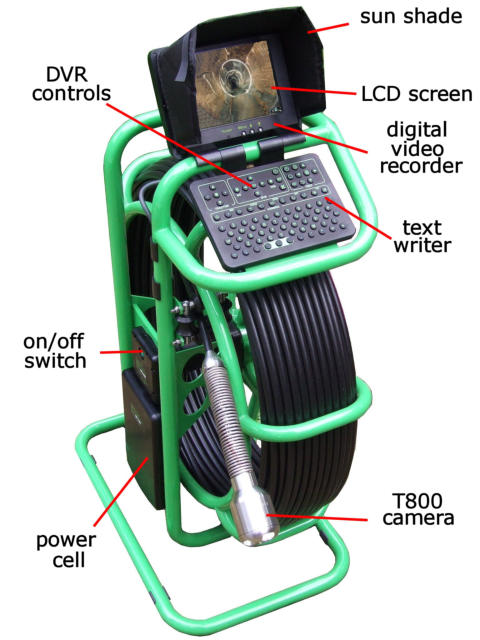
First, here is a picture of the Trogloprobe showing
where the main parts are:
How do I switch the Trogloprobe on?
There is a single, round, green ON/OFF push-button in the centre of the hub (as shown above). It will stay in further when switched ON. Press the button once and the screen will show the camera picture within a second and the ‘Troglotech Ltd’ text will be shown for five seconds.The last person to use the system didn’t
charge the batteries afterwards - the
system will not turn on - what can I do?
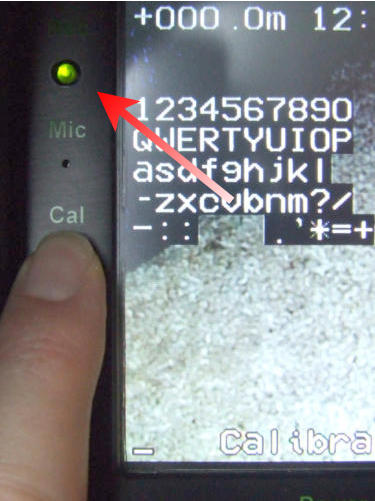
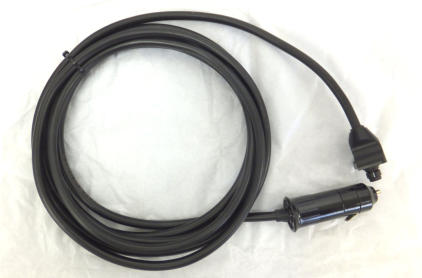
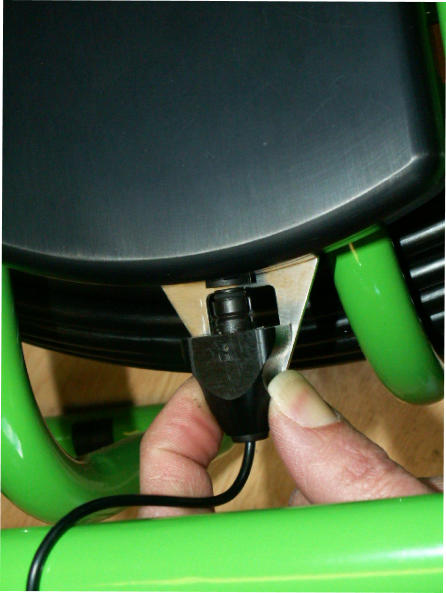
Hopefully you have the DC lead with you (supplied as an accessory with the Trogloprobe). It looks like this, some have a red cable: Plug the lead into the bottom of the battery as shown here: ...and plug the other end into your car or vans cigar- lighter socket. This will charge the battery and allow you to work as long as you can get your van close enough. Otherwise, run the engine on the car or van and this will speed the charging up so that for each 10 minutes of charging you will get around 30 minutes use of the system.The screen shows ‘Calibrate Counter’,
how do I do that? And what is it there
for?
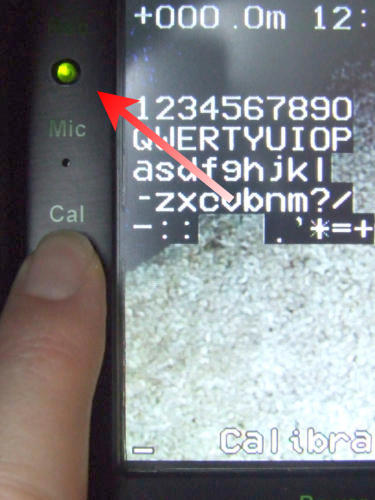
Before you start un-reeling the rod from the Trogloprobe, press the ‘Cal’ (calibrate) button until the screen shows ‘Counter Calibrated’ I’m pressing the ‘Cal’ button in the picture below:. Calibrating the rod counter before you un-reel the rod allows greater accuracy of the counter. There is no need to get the camera touching the coiler - within a Metre or so will do fine.How do I switch between Metric and
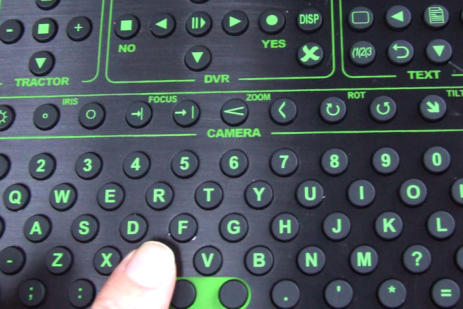
Imperial units (Metres and Feet)?
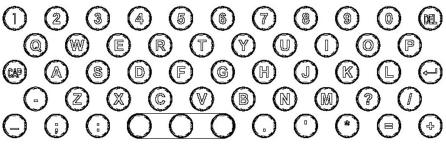
On a Trogloprobe system that is fitted with a Keyboard (nearly all systems have the keyboard fitted), when you switch the Trogloprobe ON and before pressing any other keys, press the ‘C’ key on the Keyboard (C for Counter). Each press will toggle the units from: 000.0’ (feet) to 000.0m (metres) and back again. That’s all you need to do. Even if the Trogloprobe is switched OFF it will remember the setting. Just in case, here’s a picture of me pressing the ‘C’ key:I want to measure between two displaced
joints - how do I do that?
Position the camera so that you are right next to the displaced joint (or any other feature you want to measure) and give the ‘Cal’ a short press of less than two-seconds. This will set the rod-counter to 000.0. Pushing the camera further forwards will increase the counter; pulling the camera backwards will make the counter show a negative distance. Stop the camera when you have reached the second point - the rod- counter will show the exact measurement between the two points.How do I record the survey?
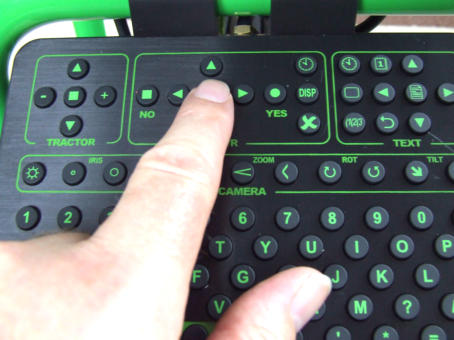
As long as you have a CF/SD card inserted all you have to do is wait for the LED to the left of the screen to turn GREEN and then press the record button on the keyboard - here’s where it is: The LED tells you if the Digital Video Recorder (which is built into the LCD screen) is ready to do something. It has three states: GREEN = DVR is OFF and ready to do something OFF = DVR is busy doing something FLASHING RED = DVR is RECORDING The LED can be seen here just above the ‘Mic’ label: if the LED does not flash RED when recording something is wrong - that usually means that no CF card is fitted or it is full. When the Trogloprobe is first switched ON the LED will stay OFF until the DVR is ready to do something. When it is ready it will turn GREEN.How do I stop the recording when I have
finished the survey?
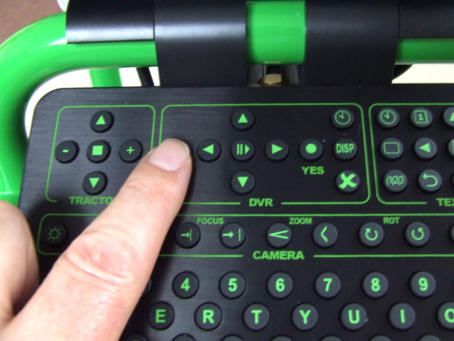
Press the STOP button on the keyboard - I’m pressing it here: The DVR LED will stop flashing red, and after a few seconds will turn GREEN showing the DVR is OFF.How do I play the video I just recorded to
see if it is OK?
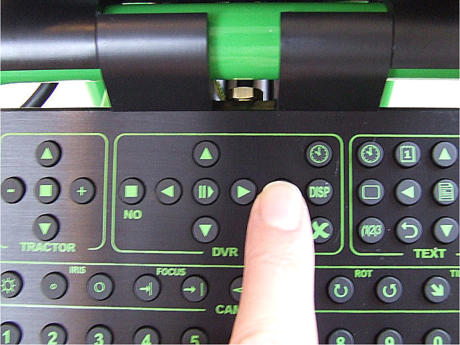
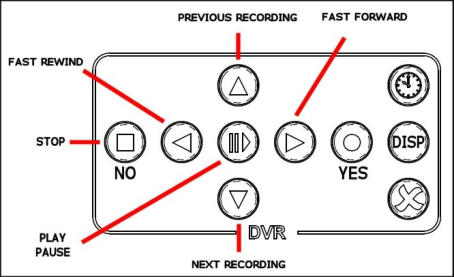
As long as the DVR LED is GREEN, just press the PLAY button, I am pressing it here: The DVR LED will go off, and after a few seconds the video will start playing on the screen. The DVR will always play the last video that was recorded. When the recording finishes it will start playing the first recording, then the second and so on. Press the STOP button when you are happy the recording is OK. You can use the left and right arrow keys on the DVR section of the keyboard to Fast Forward or Fast Reverse the playback speed. The up and down arrows in the same section select the next video (down arrow) and previous video (up arrow)What does the DISP button do in the DVR
section of the keyboard?
If the DVR is off (DVR LED is GREEN) pressing the DISP button will switch the DVR ON and after a few seconds it will show how much space (in MegaBytes and minutes of recording time) is left on the CF card on the screen. The DVR will then switch OFF again. If the DVR is either recording or playing it will immediately show the same information on the screen (the information isn’t recorded if you are in the middle of a recording), pressing the DISP button again will remove the information from the screen I want to add my voice to certain parts of the recording, how do I do that? Just as above, when the system is first switched ON and before pressing any other keys, press the ‘M’ button (M for Mute). You will see, in the bottom left- hand corner of the screen, a small picture that changes between: (Microphone OFF) and (Microphone ON) The picture stays visible as long as you hold the key down. Each press of the ‘M’ button will toggle the Microphone between OFF and ON. The button can be pressed at any time as long as the Textwriter is in ‘VIEW’ mode. The Textwriter is always in ‘VIEW’ mode when first switched ON. The Microphone is just above the Cal button on the LCD Screen - you can see it in the ‘Calibrate Counter’ section above, it is just a small hole in the housing - but is completely waterproof. You do not need to be right up against the Microphone to get a good recording, a couple of feet away will do - unless you are in particularly noisy surroundings - in that case get as close as possible. The audio level is automatically set by the Trogloprobe for a good recording.How do I stop the rod-counter, time and
date and text being shown on the screen?
There is a button for each of the above in the TEXT area of the keyboard, pressing these four buttons turns on or off the Time, Date, Text and Rod-Counter:I want to write some text on the screen
that will be recorded on the video - how
do I do that?
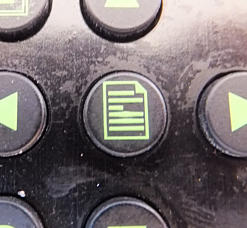
I will not cover much of Text writing here, that is better served by reading the on-line manual. But, if you just want to get some text on the screen here are the basics. Firstly, there is the EDIT/VIEW button that is in the middle of the TEXT area of the keyboard - it looks like this: Pressing the button switches between the two modes, EDIT and VIEW. When in EDIT mode the cursor will flash on the screen and an arrow will appear in the bottom right of the screen next to the letter ‘P’. EDIT mode allows you to write text on the screen When in VIEW mode the cursor and the arrow will disappear. VIEW mode is used most of the time except when you want to edit or write new text on the screen. The T804 Trogloprobe always starts in VIEW mode when first switched ON. So, to write text on the screen, press the EDIT/VIEW button so that the cursor starts flashing on the screen - and then simply use the textwriter keys to type your text. Just in case, here are the textwriter keys: You can move the cursor around the screen with the arrow keys in the TEXT section of the keyboard. The ENTER key on the keyboard moves the cursor to the start of the next line. When you have finished typing press the EDIT/VIEW key so that the cursor disappears from the screen. Your typing will be saved as you type so that even if you switch the unit OFF the text will be retained when the T804 is switched ON again.There is text on the screen already - how
do I get a blank page to start with?
You have a couple of choices - select a blank page from the 9 pages that are available - or delete the text from the current page. To select another page - when it VIEW mode, press the number buttons on the keyboard (0-9) to select that page, hopefully one of them will be blank! To delete the text on the chosen page - when in VIEW mode press the DEL button. The bottom of the screen will show ‘DELETE PAGE? Y or N’ - press the ‘Y’ key to delete the text on that page.I only want to delete a bit of the text
though - how do I do that?
Press the EDIT/VIEW button so that the cursor flashes on the screen. Use the arrow buttons in the TEXT area of the keyboard to move the cursor underneath the character you want to delete. Press the DEL button, this will delete the character and move the cursor to the left, ready to delete the next character. Repeat until you have deleted the characters you want removed.faq
Can the system be used in heavy rain?
Yes, the complete system is fully waterproof to IP67 and our cameras IP68 - if you really wanted, you could operate the complete system at the bottom of a swimming pool! Where other systems would fail in the lightest of showers, our systems keep working, and working safely For comparison, other manufacturers systems that are classed as IP54 means that they are not even dust-proof let alone waterproof!How long does the battery last?
From a single overnight charge, the Power Cell fitted to the T804 will keep the system running for up to 8 hours. We say ‘up to’ as the mission time is affected by the proportion of the survey that is recorded - if recording all the time, the mission time is reduced to 6 hours. However, the mission time is extended when the one-inch T710 camera is used as it demands less energyCan the Power Cell be re-charged on-site where a
mains supply is not available?
Yes, we can supply a DC lead that connects the Power Cell to a vehicle cigar-socket. This is best used between surveys. A 30-minute charge will give around an hours survey. The Power cell will charge faster if the engine is running. We do not recommend having the system connected to a vehicle whilst surveying as the lead could be a trip hazardAre the batteries damaged if not charged for a
long time?
No, you can leave the battery fully charged or completely discharged and no damage will occur over many years. The batteries have no ‘memory effect’ and will provide many years of service however they are stored or charged. 12-year old Trogloprobe systems are still using the original batteries and providing a full-days operation from a single charge. The need to charge batteries every month is only where a manufacturer uses old battery technology such as NiMH or NiCad - Troglotech only use Lithium Ion in all their products.Does the battery’s operating time change with
temperature?
No, we use the latest Lithium-Ion battery technology, not the old NiMH or NiCad batteries.Are your camera systems compatible with Wincan
sewer reporting software?
Yes, our software was written with Wincan in mind, we can supply a lead to connect our system to a computer running Wincan. This allows the computer to read and write to our screen, report the rod-counter distance and also modify the display properties.What format is video recorded in?
We use the latest MP4 format. The MP4 format is used on the latest computers, iPads, iPhones and other mobile devices. It is a high-resolution, modern format that is fully supported by Windows and used by YouTube.Can I have more than 61M of rod fitted to my
T804?
Yes, the T804 can be ordered with up to 90M of rod. The ability to push a camera with that length of rod will be limited by the size and material of the pipe being surveyed.Does your control unit run on a Windows or Linux
operating system?
We use neither, we run our own software on the latest, fastest processors. Would you run a vehicle’s engine- management on Windows or Linux? No, neither would we, our software is just as reliable as the machined- from-solid enclosures - designed for a harsh environment - no crashes, blue-screens or lock-ups.Does the white-balance need to be set as on
other systems?
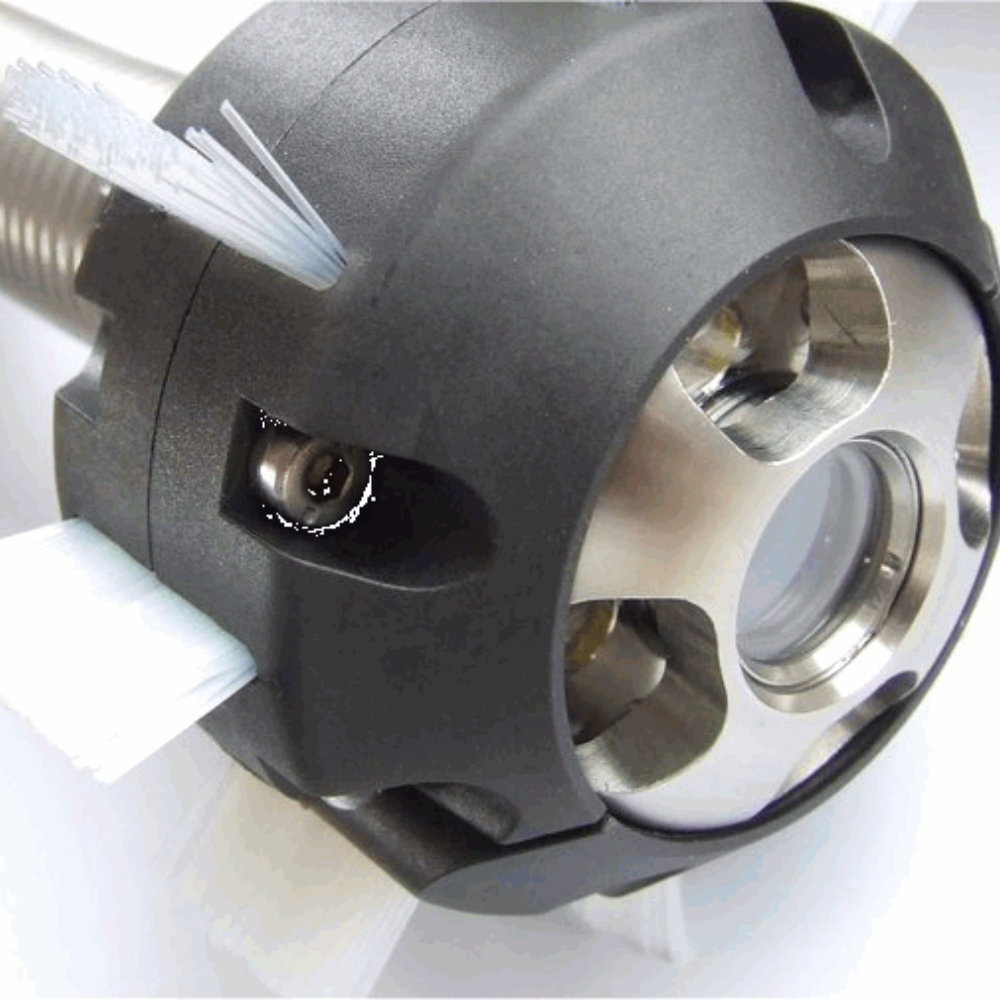
No, we designed the camera module electronics and the LED’s used in our cameras. This means that we can calibrate the cameras with a fixed white-balance to ensure the picture reflects the scene being viewed. On other systems, where the white-balance needs to set, you can be sure the colour-matrix settings are incorrect for LED use, and that means the picture will show incorrect colours. Pointing sewer cameras at white sheets of paper went out in the 1980’s!Do the cameras have to be pressurised as on
other systems?
No, pumping dirty, moist air into a camera is a sure method of destroying it, let alone the misting of the lens it causes. We design our cameras to IP68 - 7 Bar - 100 psi, that means it is safe operating to a water depth of 100 Metres. We de-humidify the cameras during the build process and they stay sealed for their lifetime.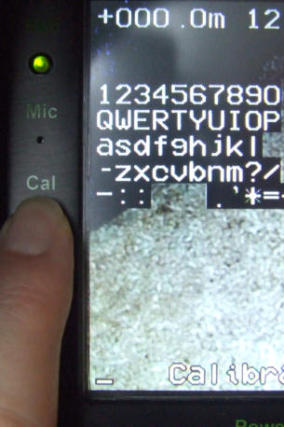


Ultimate underground technology +44 (0)1730 711 240


Help
Out in the field, don’t have the user
manual, never used the Trogloprobe
system before and only got a mobile
phone?
Here are a few simple procedures to get you started,
formatted so it can be viewed on a mobile device.
First, here is a picture of the Trogloprobe showing
where the main parts are:
How do I switch the Trogloprobe on?
There is a single, round, green ON/OFF push-button in the centre of the hub (as shown above). It will stay in further when switched ON. Press the button once and the screen will show the camera picture within a second and the ‘Troglotech Ltd’ text will be shown for five seconds.The last person to use the system didn’t
charge the batteries afterwards - the
system will not turn on - what can I do?
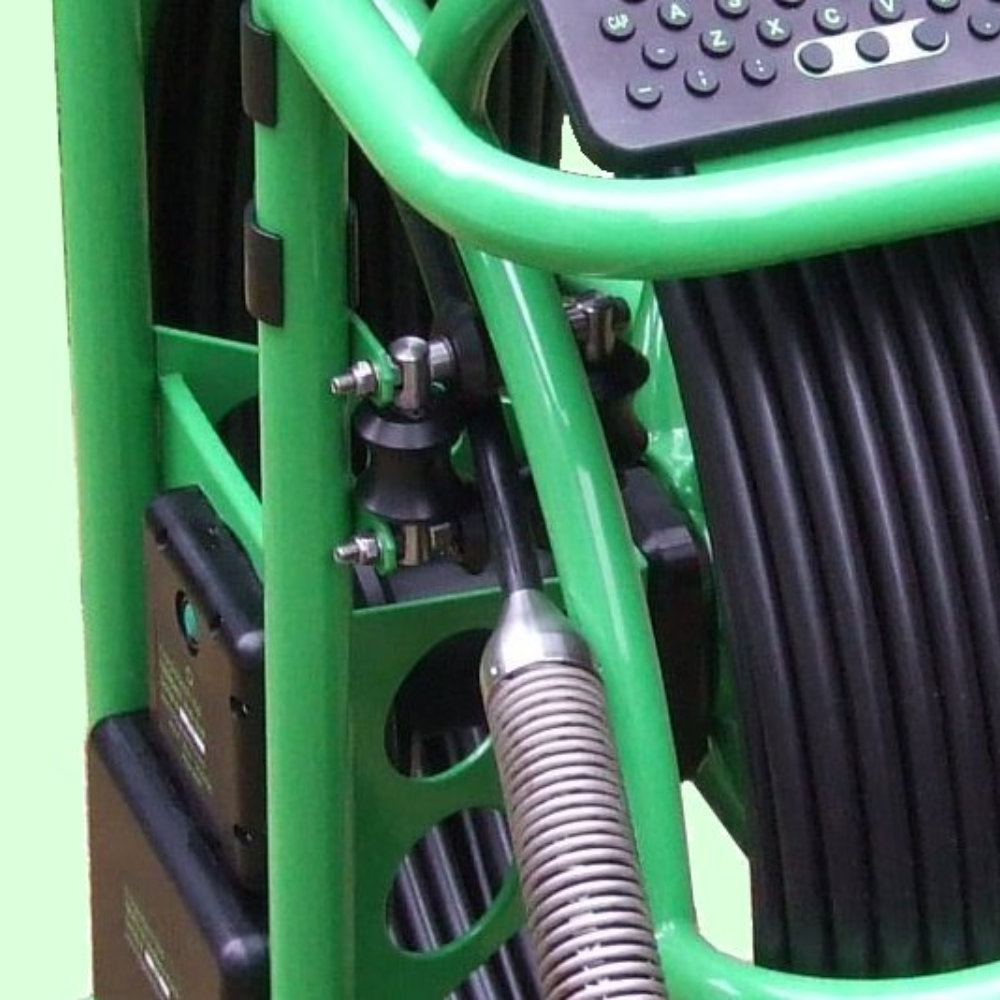
Hopefully you have the DC lead with you (supplied as an accessory with the Trogloprobe). It looks like this, some have a red cable: Plug the lead into the bottom of the battery as shown here: ...and plug the other end into your car or vans cigar- lighter socket. This will charge the battery and allow you to work as long as you can get your van close enough. Otherwise, run the engine on the car or van and this will speed the charging up so that for each 10 minutes of charging you will get around 30 minutes use of the system.The screen shows ‘Calibrate Counter’, how
do I do that? And what is it there for?
Before you start un-reeling the rod from the Trogloprobe, press the ‘Cal’ (calibrate) button until the screen shows ‘Counter Calibrated’ I’m pressing the ‘Cal’ button in the picture below:. Calibrating the rod counter before you un-reel the rod allows greater accuracy of the counter. There is no need to get the camera touching the coiler - within a Metre or so will do fine.How do I switch between Metric and
Imperial units (Metres and Feet)?
On a Trogloprobe system that is fitted with a Keyboard (nearly all systems have the keyboard fitted), when you switch the Trogloprobe ON and before pressing any other keys, press the ‘C’ key on the Keyboard (C for Counter). Each press will toggle the units from: 000.0’ (feet) to 000.0m (metres) and back again. That’s all you need to do. Even if the Trogloprobe is switched OFF it will remember the setting. Just in case, here’s a picture of me pressing the ‘C’ key:I want to measure between two displaced
joints - how do I do that?
Position the camera so that you are right next to the displaced joint (or any other feature you want to measure) and give the ‘Cal’ a short press of less than two-seconds. This will set the rod-counter to 000.0. Pushing the camera further forwards will increase the counter; pulling the camera backwards will make the counter show a negative distance. Stop the camera when you have reached the second point - the rod-counter will show the exact measurement between the two points.How do I record the survey?
As long as you have a CF card inserted all you have to do is wait for the LED to the left of the screen to turn GREEN and then press the record button on the keyboard - here’s where it is: The LED tells you if the Digital Video Recorder (which is built into the LCD screen) is ready to do something. It has three states: GREEN = DVR is OFF and ready to do something OFF = DVR is busy doing something FLASHING RED = DVR is RECORDING The LED can be seen here just above the ‘Mic’ label: if the LED does not flash RED when recording something is wrong - that usually means that no CF card is fitted or it is full. When the Trogloprobe is first switched ON the LED will stay OFF until the DVR is ready to do something. When it is ready it will turn GREEN.How do I stop the recording when I have
finished the survey?
Press the STOP button on the keyboard - I’m pressing it here: The DVR LED will stop flashing red, and after a few seconds will turn GREEN showing the DVR is OFF.How do I play the video I just recorded to
see if it is OK?
As long as the DVR LED is GREEN, just press the PLAY button, I am pressing it here: The DVR LED will go off, and after a few seconds the video will start playing on the screen. The DVR will always play the last video that was recorded. When the recording finishes it will start playing the first recording, then the second and so on. Press the STOP button when you are happy the recording is OK. You can use the left and right arrow keys on the DVR section of the keyboard to Fast Forward or Fast Reverse the playback speed. The up and down arrows in the same section select the next video (down arrow) and previous video (up arrow)What does the DISP button do in the DVR
section of the keyboard?
If the DVR is off (DVR LED is GREEN) pressing the DISP button will switch the DVR ON and after a few seconds it will show how much space (in MegaBytes and minutes of recording time) is left on the CF card on the screen. The DVR will then switch OFF again. If the DVR is either recording or playing it will immediately show the same information on the screen (the information isn’t recorded if you are in the middle of a recording), pressing the DISP button again will remove the information from the screen I want to add my voice to certain parts of the recording, how do I do that? Just as above, when the system is first switched ON and before pressing any other keys, press the ‘M’ button (M for Mute). You will see, in the bottom left-hand corner of the screen, a small picture that changes between: (Microphone OFF) and (Microphone ON) The picture stays visible as long as you hold the key down. Each press of the ‘M’ button will toggle the Microphone between OFF and ON. The button can be pressed at any time as long as the Textwriter is in ‘VIEW’ mode. The Textwriter is always in ‘VIEW’ mode when first switched ON. The Microphone is just above the Cal button on the LCD Screen - you can see it in the ‘Calibrate Counter’ section above, it is just a small hole in the housing - but is completely waterproof. You do not need to be right up against the Microphone to get a good recording, a couple of feet away will do - unless you are in particularly noisy surroundings - in that case get as close as possible. The audio level is automatically set by the Trogloprobe for a good recording.How do I stop the rod-counter, time and
date and text being shown on the screen?
There is a button for each of the above in the TEXT area of the keyboard, pressing these four buttons turns on or off the Time, Date, Text and Rod-Counter:I
want to write some text on the screen
that will be recorded on the video - how
do I do that?
I will not cover much of Text writing here, that is better served by reading the on-line manual. But, if you just want to get some text on the screen here are the basics. Firstly, there is the EDIT/VIEW button that is in the middle of the TEXT area of the keyboard - it looks like this: Pressing the button switches between the two modes, EDIT and VIEW. When in EDIT mode the cursor will flash on the screen and an arrow will appear in the bottom right of the screen next to the letter ‘P’. EDIT mode allows you to write text on the screen When in VIEW mode the cursor and the arrow will disappear. VIEW mode is used most of the time except when you want to edit or write new text on the screen. The T804 Trogloprobe always starts in VIEW mode when first switched ON. So, to write text on the screen, press the EDIT/VIEW button so that the cursor starts flashing on the screen - and then simply use the textwriter keys to type your text. Just in case, here are the textwriter keys: You can move the cursor around the screen with the arrow keys in the TEXT section of the keyboard. The ENTER key on the keyboard moves the cursor to the start of the next line. When you have finished typing press the EDIT/VIEW key so that the cursor disappears from the screen. Your typing will be saved as you type so that even if you switch the unit OFF the text will be retained when the T804 is switched ON again.There is text on the screen already - how
do I get a blank page to start with?
You have a couple of choices - select a blank page from the 9 pages that are available - or delete the text from the current page. To select another page - when it VIEW mode, press the number buttons on the keyboard (0-9) to select that page, hopefully one of them will be blank! To delete the text on the chosen page - when in VIEW mode press the DEL button. The bottom of the screen will show ‘DELETE PAGE? Y or N’ - press the ‘Y’ key to delete the text on that page.I only want to delete a bit of the text
though - how do I do that?
Press the EDIT/VIEW button so that the cursor flashes on the screen. Use the arrow buttons in the TEXT area of the keyboard to move the cursor underneath the character you want to delete. Press the DEL button, this will delete the character and move the cursor to the left, ready to delete the next character. Repeat until you have deleted the characters you want removed.faq
Can the system be used in heavy rain?
Yes, the complete system is fully waterproof to IP67 and our cameras IP68 - if you really wanted, you could operate the complete system at the bottom of a swimming pool! Where other systems would fail in the lightest of showers, our systems keep working, and working safely For comparison, other manufacturers systems that are classed as IP54 means that they are not even dust-proof let alone waterproof!How long does the battery last?
From a single overnight charge, the Power Cell fitted to the T804 will keep the system running for up to 8 hours. We say ‘up to’ as the mission time is affected by the proportion of the survey that is recorded - if recording all the time, the mission time is reduced to 6 hours. However, the mission time is extended when the one- inch T710 camera is used as it demands less energyCan the Power Cell be re-charged on-site where a
mains supply is not available?
Yes, we can supply a DC lead that connects the Power Cell to a vehicle cigar-socket. This is best used between surveys. A 30-minute charge will give around an hours survey. The Power cell will charge faster if the engine is running. We do not recommend having the system connected to a vehicle whilst surveying as the lead could be a trip hazardAre the batteries damaged if not charged for a long
time?
No, you can leave the battery fully charged or completely discharged and no damage will occur over many years. The batteries have no ‘memory effect’ and will provide many years of service however they are stored or charged. 12-year old Trogloprobe systems are still using the original batteries and providing a full-days operation from a single charge. The need to charge batteries every month is only where a manufacturer uses old battery technology such as NiMH or NiCad - Troglotech only use Lithium Ion in all their products.Does the battery’s operating time change with
temperature?
No, we use the latest Lithium-Ion battery technology, not the old NiMH or NiCad batteries.Are your camera systems compatible with Wincan
sewer reporting software?
Yes, our software was written with Wincan in mind, we can supply a lead to connect our system to a computer running Wincan. This allows the computer to read and write to our screen, report the rod-counter distance and also modify the display properties.What format is video recorded in?
We use the latest MP4 format. The MP4 format is used on the latest computers, iPads, iPhones and other mobile devices. It is a high-resolution, modern format that is fully supported by Windows and used by YouTube.Can I have more than 61M of rod fitted to my T804?
Yes, the T804 can be ordered with up to 90M of rod. The ability to push a camera with that length of rod will be limited by the size and material of the pipe being surveyed.Does your control unit run on a Windows or Linux
operating system?
We use neither, we run our own software on the latest, fastest processors. Would you run a vehicle’s engine- management on Windows or Linux? No, neither would we, our software is just as reliable as the machined- from-solid enclosures - designed for a harsh environment - no crashes, blue-screens or lock-ups.Does the white-balance need to be set as on other
systems?
No, we designed the camera module electronics and the LED’s used in our cameras. This means that we can calibrate the cameras with a fixed white-balance to ensure the picture reflects the scene being viewed. On other systems, where the white-balance needs to set, you can be sure the colour-matrix settings are incorrect for LED use, and that means the picture will show incorrect colours. Pointing sewer cameras at white sheets of paper went out in the 1980’s!Do the cameras have to be pressurised as on other
systems?
No, pumping dirty, moist air into a camera is a sure method of destroying it, let alone the misting of the lens it causes. We design our cameras to IP68 - 7 Bar - 100 psi, that means it is safe operating to a water depth of 100 Metres. We de-humidify the cameras during the build process and they stay sealed for their lifetime.